Installing the FaxPress SMTP Gateway
Castelle supplies the FaxPress SMTP Gateway software on the Castelle FaxPress CD-ROM. The SMTP Gateway version 9.x is designed to install on a dedicated Windows NT 4.0/Windows 2000/2003/XP workstation or server. On NT/2000/2003, the SMTP Gateway installs as a service and automatically starts up each time the workstation or server is started.
The FaxPress SMTP Gateway supports both SMTP and ESMTP mail transfer protocols.
Before running the FaxPress SMTP Gateway setup to install the software, go through the following sections carefully. The information provided is intended to help you make sure:
| ■ | network and system requirements are met ( Network and System RequirementsSee Network and System Requirements) and the user who will run the Email Gateway service is correctly registered on the network (SeeCorrect Order of Installations, With Correct User Name) |
| ■ | your mail server is prepared with the correct lookup information for your fax domain (See Preparing Your SMTP Mail Server or Agent) |
| ■ | required setup information is accessible (See Required Information for SMTP Gateway Setup) |
| ■ | the SMTP Gateway workstation is prepared (See Preparing the SMTP Gateway Workstation) |
| ■ | native attachment applications are installed (See Native Attachment Applications |
| ■ | the SMTP Gateway’s Administrator NT account is correctly configured with adequate permissions and DCOM services (See Preparing the SMTP Gateway’s NT Account) |
Make sure you have Administratorrights to the SMTP Gateway workstation and your network’s SMTP mail server or agent.
Network and System Requirements
The workstation or server used for the FaxPress SMTP Gateway must meet the following minimum specifications or exceed them.
Operating System and Hardware:
| ■ | Windows NT 4.0 Workstation or Server, Windows 2000 Pro or Server, Windows 2003 Server, or Windows XP Pro recommended, with the latest Microsoft Service Packs |
| ■ | a Pentium III 500 MHz CPU or faster (or equivalent) |
| ■ | 256 MB of RAM |
| ■ | a network interface (NIC) card |
| ■ | minimum 512 MB of free hard disk space. The amount of hard disk space required depends on fax traffic volume. High volume situations require a dedicated higher spec workstation. |
It is HIGHLY recommended that this system be DEDICATED for running the FaxPress Email Gateway. Since the Email Gateway interacts with other applications and the desktop, there is a significant potential for conflict if this system is used as a workstation or as an application for other third party applications. Also, no other SMTP service that binds to port 25 should be running on this system.
Applications:
Make sure you install all applications for which email-to-fax attachments are to be processed on the system. The user running the Email Gateway service must log into the system and launch each application at least once; see Correct Order of Installations, With Correct User Name for details.
Before starting the SMTP Gateway setup to install the Gateway, make sure your network:
| ■ | has at least one FaxPress server installed and operational |
| ■ | is running an SMTP email server or agent (Lotus, GroupWise, or Exchange) |
| ■ | is not running any other FaxPress Email Gateway product. |
Correct Order of Installations, With Correct User Name
It is essential that the SAME user is registered as the one running the Email Gateway and all of the applications used for attachments that will be sent via the Email Gateway as faxes. To achieve this goal, take the following steps, in exactly the indicated order.
| 1. | Create an account for a unique user on the network containing the dedicated machine that will be used for the FaxPress Email Gateway system. The username could be, for example, FaxGateway. This name will be used in the following steps. |
| 2. | Log onto the dedicated machine and create a local user account for FaxGateway, the user you created in Step 1. Make FaxGateway an Administrator of the dedicated machine, and give FaxGateway administration rights and permissions on the dedicated machine. |
| 3. | Log onto the dedicated FaxPress Email Gateway system as FaxGateway. If you are dealing with a MAPI environment, create an Outlook account on the network’s Outlook service for FaxGateway. |
| 4. | Install Microsoft Outlook, then the Microsoft Office suite of applications, and finally, all of the latest Service Packs, on the dedicated FaxPress Email Gateway system. Launch Outlook and then each of the Office applications, and complete all registration requirements, so that no registration dialog boxes open when you re-launch each application. Go through the same installation and launching procedure for Adobe Acrobat and any other applications that will be needed for attachments that may be faxed. |
| 5. | Configure FaxGateway’s network account with adequate permissions and DCOM services. See Preparing the SMTP Gateway’s NT Account for details. |
| 6. | Install the FaxPress 9.x software on the dedicated FaxPress Email Gateway system. Uninstall any previous version before installing the latest version. |
| 7. | Install the FaxPress Email Gateway software on the dedicated Email Gateway System by running SMTP Gateway setup. |
Preparing Your SMTP Mail Server or Agent
For your mail server and the FaxPress SMTP Gateway to exchange information across the network, the workstation used for the FaxPress SMTP Gateway must be able to accept mail for a subdomain within the network – fax.company.com, for example. To do this, your SMTP mail server must also be able to determine where to send messages addressed to the SMTP Gateway, generally by using one of two methods:
| ■ | DNS Lookup |
| ■ | forward to an SMTP mail server. |
DNS Lookup
If your company’s SMTP mail server uses DNS lookup, enter an MX (mail exchange) record for the FaxPress SMTP Gateway in the DNS database.
Forward to a Mail Server
Sometimes an SMTP mail server is configured allow a different SMTP server (e.g., the ISP’s) to handle DNS lookup. In this case, you will need to make sure that the DNS server used by the final SMTP mail server can make the correct MX lookup. Some mail servers can also be configured to forward to specified hosts if certain domains are addressed. Refer to these chapters for specific information regarding your mail server.
| ■ | Exchange 5.5 and the Email Gateway for Generic SMTP |
| ■ | Creating an SMTP Connector on Exchange 2000/2003 |
| ■ | Creating an SMTP Connector on Exchange 2000/2003 |
Some mail systems will also look at their local host table to determine where to send mail before they perform a DNS lookup. If this is the case it is not necessary to enter an MX record in DNS for the FaxPress SMTP Gateway.
DNS configuration will depend on the way your network is set up. Configure your DNS lookup and name resolution by referring to the following information:
| 1. | If your mail server is configured to do DNS lookup and name resolution on your own internal DNS server, you’ll need to create two entries: |
| ■ | Create an A record with the SMTP Gateway workstation name and IP address |
| ■ | Create an MX record with the SMTP Gateway workstation name and SMTP Gateway service alias name |
| 2. | If your mail server is configured to use your ISP’s DNS server for your DNS lookup and name resolution, ask your ISP to configure the above entries in their DNS sever. |
| 3. | If your mail server is configured to do DNS lookup and resolution on an internal or external third-party mail gateway, configure the above entries on that third-party gateway. |
Once the DNS is correctly configured, you should be able to ping the SMTP Gateway’s alias name (e.g., fax.yourcompany.com) with a reply from the IP address of the SMTP Gateway workstation.
If your ISP’s DNS server is used, for security reasons the FaxPress SMTP Gateway should be set to exclude messages not sent from privileged domains. See Email Inclusion List andEmail Exclusion List.
Preparing the SMTP Gateway Workstation
Install the FaxPress SMTP Gateway on a workstation or server other than the one running your regular SMTP email server or agent – two SMTP servers on the same machine will conflict because both will need to listen on the same port (25). The workstation used for the FaxPress SMTP Gateway must:
| ■ | have the FaxPress 9.x client installed and operational. This provides the Castelle DCX Driver required for file conversion. |
| ■ | be assigned a static IP address; this IP address must be mapped to the SMTP Gateway’s alias name. |
| ■ | have all application software required to provide native attachment support installed and operational. Ideally, use the SMTP Gateway’s Administrator account to install these applications. (See Native Attachment Applications.) |
Native Attachment Applications
The FaxPress SMTP Gateway converts fax-addressed email messages to faxable format, then passes them to the FaxPress server for processing. The SMTP Gateway opens the file in its native application, then converts the file to a format the FaxPress can process and fax.
For the SMTP Gateway to provide native attachment support, the FaxPress SMTP Gateway NT service must have access and launch permissions for all pertinent applications, DLLs and files. To prevent failed file attachments, make sure software application versions are consistent across the network.
Output files from other applications that support the Shell execute method may also be successfully attached. To determine which native attachments may work with FaxPress:
| 1. | Select the file in Windows Explorer. |
| 2. | Right-click to display a context menu. |
| 3. | Select the Print option. (If no Print option is present, FaxPress will not support the attachment.) |
If the associated application is launched and the file prints, then it is likely to be supported as a FaxPress native attachment.
Preparing the SMTP Gateway’s NT Account
The FaxPress SMTP Gateway requires an NT Administrator account it can use to log onto the NT network. The NT workstation’s default Administrator account for the SMTP Gateway can be used for this purpose. If, however, you don’t want to use that account for the SMTP Gateway service, you must create or designate an account with Administrator privileges for the SMTP Gateway’s use. You should use this Administrator account to install any applications the FaxPress SMTP Gateway will use to convert attachment files to faxable format. This way, the FaxPress SMTP Gateway will have access rights to and launch permissions for all local applications, DLLs and files. For details on this issue, see Correct Order of Installations, With Correct User Name.
If you decide to create an Administrator account specifically for the SMTP Gateway, make sure you log on to the SMTP Gateway workstation at least once using the account to allow the SMTP Gateway to convert attached files. Logging on initializes the HKEY_CURRENT_USER registry keys and printer entries, and confirms the SMTP Gateway will be able to convert attached files using the new Administrator account.
This NT account also serves as the template the SMTP Gateway’s Auto Registration uses to automatically create FaxPress accounts for non-FaxPress users the first time they use the SMTP Gateway.
Configuring DCOM
To provide the FaxPress SMTP Gateway with the required access rights, DCOM privileges must be set on the Email Gateway NT 4.0 or Windows 2000/2003 machine.
For NT 2000 installs, be sure to refer to DCOM Services and Windows 2000/2003 - IMPORTANT!.
To set up DCOM privileges in NT, follow these steps:
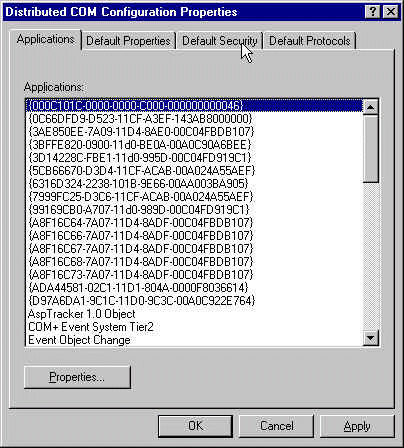
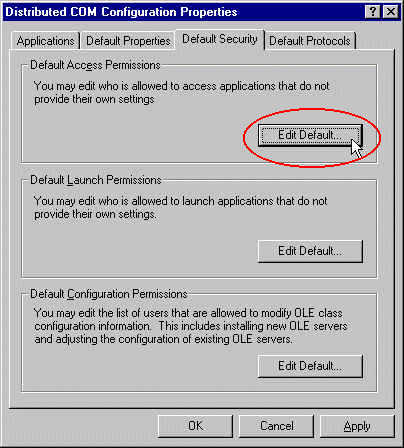
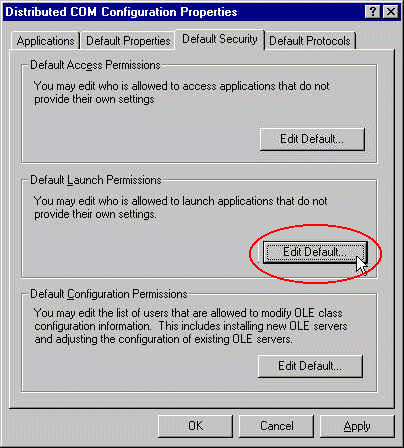
| 1. | Click Start>Run. Type dcomcnfg and click OK to bring up the Distributed COM Configuration Properties dialog box. Select the Default Security tab. |
| 2. | Under Default Access Permissions, click Edit Default. |
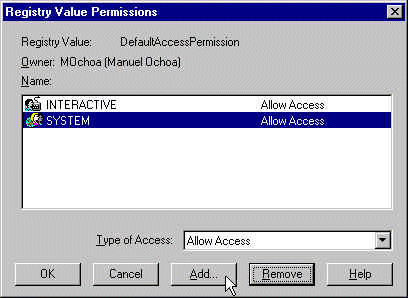
| 3. | The Registry Value Permissions dialog box appears. The Registry lists the Administrators and groups with permission to access applications on the workstation. Click Add. |
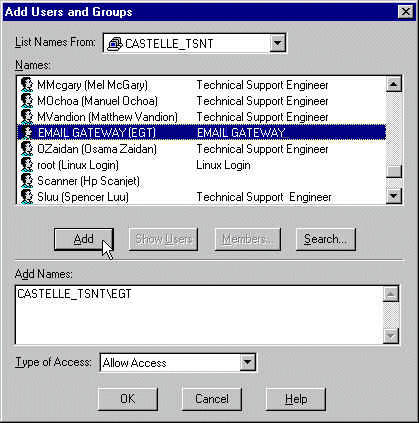
| 4. | In the Add Users and Groups dialog box, select the name of the New User Account you’ve created for the Email Gateway Service from the Add Names list, or select the Administrator user account. Click Add. If you’re using Windows 2000, you must also add the System and Interactive groups. When you have added all necessary users, click OK to return to the Registry, then click OK to return to the Default Security tab. |
| 5. | In the Default Launch Permissions area, select Edit Default. |
| 6. | The Registry for Default Launch Permission appears. This Registry lists the Administrators and groups with permission to run applications on the workstation. Click Add. |
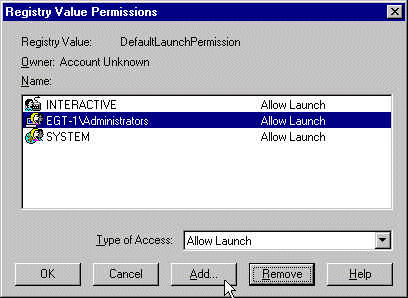
| 7. | In the Add Users and Groups dialog box, select the name of the New User Account you’ve created for the Email Gateway Service, or select the Administrator user account. Click Add. If you’re using Windows 2000, you must also add the System and Interactive groups. When you have added all necessary users, click OK to return to the Registry, then click OK to return to the Default Security tab. |
| 8. | Close the Distributed COM Configuration Properties dialog box. |
DCOM Services and Windows 2000/2003 - IMPORTANT!
In Windows 2000/2003, unlike Windows NT 4.0, the interactive and system accounts must be added manually to the Access and Launch permissions lists after the Email Gateway is added to maintain their Access and Launch permissions.
The original, default configuration for any freshly installed Windows 2000/2003 machine is this: If the Access and Launch permissions lists are empty, the system and interactive accounts have permissions, even though they are not explicitly listed.
When a new user or group is added, however, to the empty Access or Launch permissions list, the interactive and system accounts’ permissions are removed and only the newly added, explicitly listed user or group will have permissions.
In other words, when the Email Gateway is added to an empty Windows 2000/2003 Access or Launch permissions registry list, it becomes the only user specified with permissions. This means that the interactive and system accounts won’t function properly until.their original Access and Launch permissions are restored by explicitly reassigning them.
To provide the Interactive and System accounts with the explicit permissions required, repeat the steps described in the section above, first adding the Interactive account, then the System account, to the Access and Launch Permissions lists.
In Windows NT 4.0, unlike Windows 2000/2003, the system and interactive accounts maintain their access rights even if they are not explicitly listed.
Required Information for SMTP Gateway Setup
The SMTP Gateway setup requires the following information.
FaxPress Server Serial Number
(required for licensing the SMTP Gateway)
Serial Number:__________________
FaxPress Server’s Name/IP Address
Name: ____________________
IP Address: _ _ _ / _ _ _ / _ _ _ / _ _ _
FaxPress Account User Name and Password
User Name: _______________
Password: _________________
SMTP Server’s Host Name/IP Address
Host Name:_________________
IP address: _ _ _ / _ _ _ / _ _ _ / _ _ _
NT Logon Account Information
Setup requires the user name and password the SMTP Gateway will use to log onto the NT network, (e.g., the Administrator)privileged user you created for the FaxPress SMTP Gateway. Configuration requires a Administrator email address.
User Name:_________________________
Password:______________________
Domain: _________________________
Email address:_______________________
SMTP Gateway’s Subdomain Name
Domain Name:______________________
SMTP Gateway’s Static IP Address
The SMTP Gateway requires a static IP address, even if the rest of the network is DHCP.
static IP address: _ _ _ / _ _ _ / _ _ _ / _ _ _
FaxPress SMTP Gateway Installation Procedure
Before running the setup disable all anti-virus programs running on the workstation and close all Windows applications. Confirm the workstation you’re using has the FaxPress 9.x client installed and operational.
Follow these steps to install the Email Gateway software:
| 1. | Log on with supervisor or equivalent privileges. |
| 2. | Place the Castelle FaxPress 9.x CD-ROM in your drive. The Castelle FaxPress Setup screen will launch automatically. If Autorun is disabled on your machine, and setup does not launch automatically, select Start>Run, then type CD-Drive-Letter:\AUTORUN.EXE and click OK. |
| 3. | In the Castelle FaxPress Setup screen, select Install Client. |
| 4. | In the FaxPress Setup screen, select the first button, which lists Add-on Products. |
| 5. | In the FaxPress Setup screen, click Next>. |
| 6. | In the first Select Components screen, select the Administrator Installation will install button. |
| 7. | Select Add On Products. |
| 8. | In the FaxPress Add On Products screen, select Next>. |
| 9. | Select Email Integration. A warning message appears, telling you which FaxPress servers are supported by the Gateways software. Click OK. A screen appears with a new set of components you can select. |
| 10. | Click the Generic SMTP Mail Systmes option. |
| 11. | The User Account Information dialog box requires you to enter information that will allow the FaxPress SMTP Gateway service to log onto NT and to use the available resources. The SMTP Gateway will only have access to resources this user installs or has permissions to. This user must have access and permissions to applications used by the SMTP Gateway to convert attachments to faxable format. |
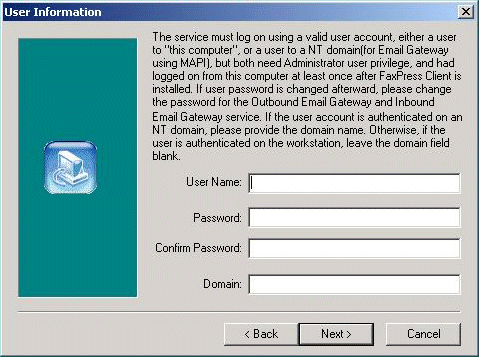
In the Name and Password fields, enter the user name and password the SMTP Gateway will use to log onto the NT network. We recommend that you use the user you created for the FaxPress SMTP Gateway.
In the Domain field, enter the name of the domain that is associated with and authenticates the user’s account. If the user account is on the local machine, enter the name assigned to the local machine.
Click Next>.
| 12. | The FaxPress Add On Products screen displays the default destination directory. |
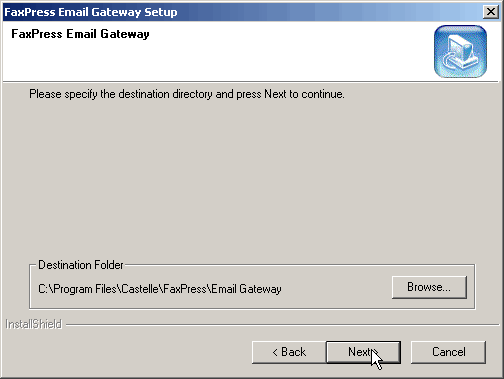
| 13. | To install the SMTP Gateway to a different location, click Browse. Otherwise, click Next>. |
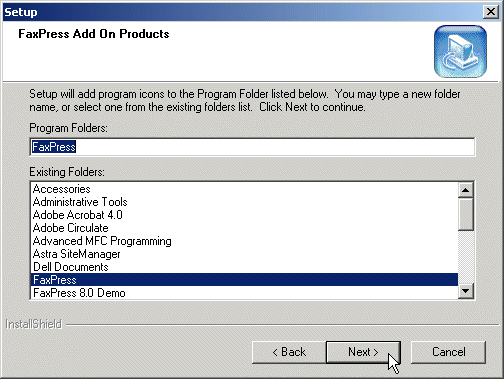
| 14. | The FaxPress Add On Products screen displays the SMTP Gateway’s default program folders. Rename, or click Next>. |
Setup will now copy the SMTP Gateway files and automatically launch the FaxPress SMTP Configuration utility. This utility allows you to set parameters the FaxPress SMTP Gateway needs to communicate with your mail server. The FaxPress SMTP Gateway must be configured with a few basic settings before being used for faxing.
|
FaxPress WebHelp
Last Updated: 9/12/2007
E-mail this page |
Castelle 855 Jarvis Drive, Suite 100 Morgan Hill, CA 95037 Toll-free 800.289.7555 Tel 408.852.8000 Fax 408.852.8100 |